Configuration Manager applications can be equipped with powerful requirement rules. For example an application must be installed only if there is enough disk space on the target device or only if the device is the users primary device. The second example is an important requirement rule when working with user device affinity. Configuring this kind of rule is done in a few seconds using the management console. However, scripting the rule with PowerShell is much more difficult. As of today the cmdlets provided by Microsoft for automating Configuration Manager assets do not support building requirement rules for deployment types. But as always there is a workaround. In my case I’ve decided to create an application template containing all requirement rules and copy specific rules from there to other applications.
With additional steps in an image deployment task sequence the log files will grow quite big. By default the Configuration Manager client keeps a log history of 0 and a size limit of 2 MB for each log file. In result you’ll find yourself missing important details when trying to debug a failed operating system deployment. At some point the log files will be cut off. In order to increase the log size and retention, parameters must be configured in two places.
Traceability is key when collaborating in the Active Directory (AD). Multiple admins changing and updating permissions and policies makes it difficult being compliant with the company’s policies. It is important to monitor mutations in the directory. By default audit policies are disabled for Domain Controllers (DC) and must be enabled explicitly. Enabling auditing for the DCs is quite easy, querying the logs for a specific event is a bit more difficult.
In this guide you’ll learn how to enable auditing for a specific case and how to query the audit logs for a specific event.
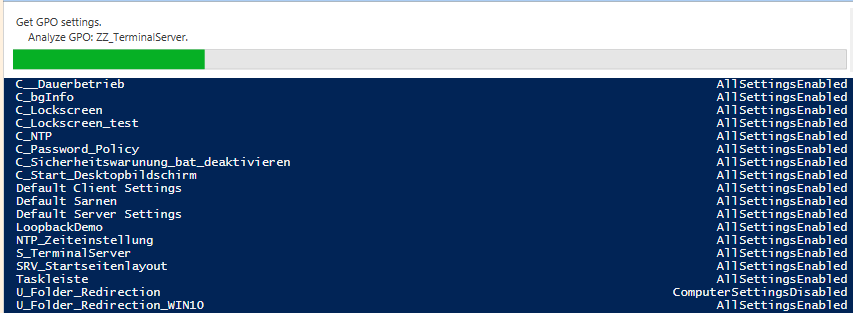
In terms of IT compliance having valid GPOs is essential. They must be update to date and the GPO directory should be free of any unlinked GPOs. Retrieving a list of unlinked GPOs in the management console is impossible. With PowerShell it is quite easy.
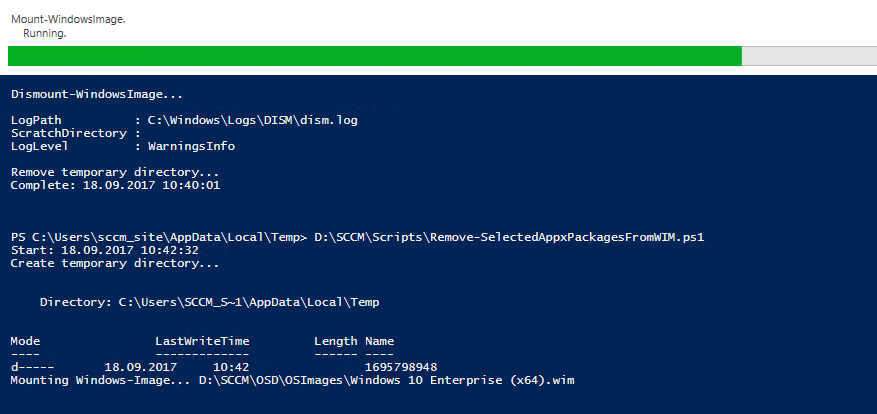
While preparing a Windows image for SCCM deployment I looked for a viable solution to remove Windows apps from the image. SCCM offers a lot options to execute this kind of action such as running a task sequence or install an application. But none of the options worked out for me. Either they were too complicated to configure or simply didn’t work as expected. Today I’ve found a script on TechNet seemed to a good solution. This script showed me how easy it is to mount a windows image and remove the app packages directory from it. However, the script was outdated and didn’t offer the option to remove only selected apps. That’s why I’ve created my own remix of the script.
“Manage the life cycle of your SCCM applications with PowerShell” is a short post series where I share my PowerShell experience with System Center Configuration Manager. In my last post I’ve shown you a script to distribute application content and deploy an application to its collections. In my final post I’ll show you the last part of the app life cycle - the termination.
“Manage the life cycle of your SCCM applications with PowerShell” is a short post series where I share my PowerShell experience with System Center Configuration Manager. In my last post I’ve shown you a script that creates applications and all assets required to deploy it. This time I have a script to distribute the application content and deploy the application to its collections.
“Manage the life cycle of your SCCM applications with PowerShell” is a short post series where I share my PowerShell experience with System Center Configuration Manager. In my last post I’ve showed you a script that creates the package source folder structure and another that adds the service users for SCCM. As mentioned these scripts have only been published for a better understanding of the follow-up scripts.